| 1
|

|
Set SCS Project Base Path to root folder of the mod 02_truck_accessory/mod_accessory.
|
| 2
|
|
Delete the default cube from the Blender scene and start modeling the front grill as shown on the video on the left.
|
| 3
|

|
Create empty blender object at the X: 0, Y: 0, Z: 0 coordinates.
|
| 4
|

|
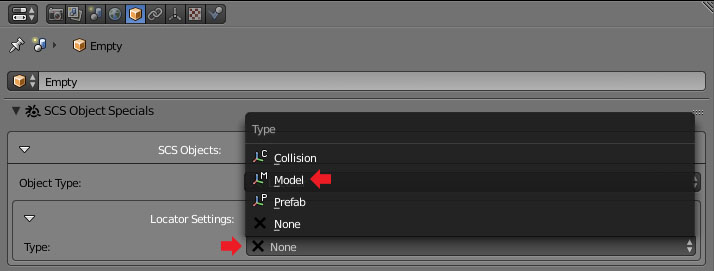
Navigate to the Object Type selection.
|
| 5
|

|
Select object tzpe to Locator.
|
| 6
|

|
In the locator type select Model.
|
| 7
|

|
Name locator as slot_0.
|
| 8
|

|
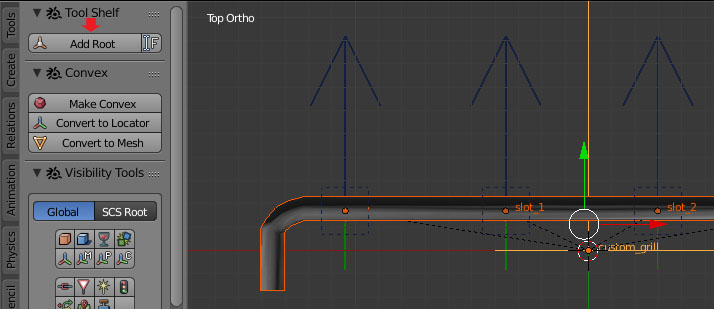
Duplicate locators and place them as shown on the image. Also please call all the locators from left to right as.
- slot_0
- slot_1
- slot_2
- slot_3
|
| 9
|

|
Create root object and call it the same way as you called in the definition file - so it will be custom_grill.
|
| 10
|

|
Set default export path to location defined inside custom_g.sii file created in the previous tutorial. If you did everything as shown in the tutorial it should be //vehicle/truck/upgrade/frontgrill/renault_magnum_2009.
|
| 11
|

|
- Set mod directory path.
- Set mod name.
- Enable Auto Clean, Auto Export and Auto Conavert options and set compression format to Deflated.
- Start conversion and packing of the mod by clicking on PACK CONVERTED DATA button.
|


