Difference between revisions of "Documentation/Tools/SCS Blender Tools/Locators/Prefab Locators"
(→Action) |
|||
| (12 intermediate revisions by the same user not shown) | |||
| Line 14: | Line 14: | ||
# If prefab should be extended with in game generated terrain, then control node has to have terrain points assigned on it's '''''right''''' side. | # If prefab should be extended with in game generated terrain, then control node has to have terrain points assigned on it's '''''right''''' side. | ||
| − | [[File:SCS_Tools_Locators_Prefab_CN.png]] | + | [[File:SCS_Tools_Locators_Prefab_CN.280.png]] |
=== Node Index === | === Node Index === | ||
| Line 38: | Line 38: | ||
<blockquote>{{Note|If you are not able to assign any sign to "Sign Model" property, make sure your Sign Library path is properly set.}} | <blockquote>{{Note|If you are not able to assign any sign to "Sign Model" property, make sure your Sign Library path is properly set.}} | ||
</blockquote> | </blockquote> | ||
| − | [[File:SCS_Tools_Locators_Prefab_SIGN.png]] | + | [[File:SCS_Tools_Locators_Prefab_SIGN.280.png]] |
=== Sign Model === | === Sign Model === | ||
Property defining sign id which shall be used in the game. | Property defining sign id which shall be used in the game. | ||
| + | |||
| + | Additionally button <span style="color:#FFFFFF">{{Blender Button|'''🗘'''}}</span> on the right side gives possibility to reload sign models library on the fly, without need to navigate to global settings panel. | ||
== Spawn Point == | == Spawn Point == | ||
| Line 53: | Line 55: | ||
# 2nd spawn point of type "Unload (Easy)" which defines, the point to which user has to park trailer. | # 2nd spawn point of type "Unload (Easy)" which defines, the point to which user has to park trailer. | ||
| − | [[File:SCS_Tools_Locators_Prefab_SP.png]] | + | [[File:SCS_Tools_Locators_Prefab_SP.280.png]] |
=== Spawn Type === | === Spawn Type === | ||
| Line 63: | Line 65: | ||
Traffic semaphore locators define stop and go actions for AI traffic. Primarily it's used for traffic lights but it can also be used for any other game defined profile, for example stopping AI car at gas station for fuel filling. | Traffic semaphore locators define stop and go actions for AI traffic. Primarily it's used for traffic lights but it can also be used for any other game defined profile, for example stopping AI car at gas station for fuel filling. | ||
| − | It's behaviour is defined by selected "Profile" and it's bind to user specified "ID". Selected "ID" is then used in "Navigation Points" to define effected AI traffic lane of this semaphore (check [[ | + | It's behaviour is defined by selected "Profile" and it's bind to user specified "ID". Selected "ID" is then used in "Navigation Points" to define effected AI traffic lane of this semaphore (check [[#navigation-point|Navigation Point]] for details). |
Additionally user can specify "Type" property for defining of exceptional behaviour (use it only if you know what you are doing). | Additionally user can specify "Type" property for defining of exceptional behaviour (use it only if you know what you are doing). | ||
| − | [[File:SCS_Tools_Locators_Prefab_TS.png]] | + | [[File:SCS_Tools_Locators_Prefab_TS.280.png]] |
=== ID === | === ID === | ||
| Line 76: | Line 78: | ||
Property defining profile from Traffic Semaphore Library, which defines behaviour of traffic semaphore: intervals/distances and cycle delays. | Property defining profile from Traffic Semaphore Library, which defines behaviour of traffic semaphore: intervals/distances and cycle delays. | ||
| + | |||
| + | Additionally button <span style="color:#FFFFFF">{{Blender Button|'''🗘'''}}</span> on the right side gives possibility to reload semaphore library on the fly, without need to navigate to global settings panel. | ||
<blockquote>{{Note|If you are not able to assign any profile, make sure your Traffic Semaphore Library path is properly set.}} | <blockquote>{{Note|If you are not able to assign any profile, make sure your Traffic Semaphore Library path is properly set.}} | ||
| Line 98: | Line 102: | ||
If prefab shouldn't have any traffic inside, no navigation point locators should be created. | If prefab shouldn't have any traffic inside, no navigation point locators should be created. | ||
| − | [[File:SCS_Tools_Locators_Prefab_NP.png]] | + | [[File:SCS_Tools_Locators_Prefab_NP.280.png]] |
=== Low Probability === | === Low Probability === | ||
| Line 129: | Line 133: | ||
=== Traffic Semaphore === | === Traffic Semaphore === | ||
| − | This property binds [[ | + | This property binds [[#Traffic_Semaphore|Traffic Semaphore]] to AI traffic lanes by it's "ID" property. If "ID" property from Traffic Semaphore locator matches this property value, then AI will behave by the rules of that semaphore locator. |
=== Traffic Rule === | === Traffic Rule === | ||
Property defining additional rule for AI cars like city areas, motorways or even stop lines. This property can be set to any rule from Traffic Rules Library. | Property defining additional rule for AI cars like city areas, motorways or even stop lines. This property can be set to any rule from Traffic Rules Library. | ||
| + | |||
| + | Additionally button <span style="color:#FFFFFF">{{Blender Button|'''🗘'''}}</span> on the right side gives possibility to reload traffic rules library on the fly, without need to navigate to global settings panel. | ||
<blockquote>{{Note|Speed limit rules should be avoided in this case, because speed limits are now regulated by signs itself.}} | <blockquote>{{Note|Speed limit rules should be avoided in this case, because speed limits are now regulated by signs itself.}} | ||
| Line 164: | Line 170: | ||
# any other option - in this case map points have to lead from one control node to another, the same principle as by Navigation Point locators. | # any other option - in this case map points have to lead from one control node to another, the same principle as by Navigation Point locators. | ||
| − | [[File:SCS_Tools_Locators_Prefab_MP.png]] | + | [[File:SCS_Tools_Locators_Prefab_MP.280.png]] |
=== Road Over === | === Road Over === | ||
| Line 216: | Line 222: | ||
Example of trigger points usage is marking rest areas on prefabs for Euro Truck Simulator 2 with a polygon. | Example of trigger points usage is marking rest areas on prefabs for Euro Truck Simulator 2 with a polygon. | ||
| − | [[File:SCS_Tools_Locators_Prefab_TP.png]] | + | [[File:SCS_Tools_Locators_Prefab_TP.280.png]] |
=== Action === | === Action === | ||
Property defining action which should trigger when player enters area. Available actions are predefined and loaded from Trigger Actions Library. | Property defining action which should trigger when player enters area. Available actions are predefined and loaded from Trigger Actions Library. | ||
| + | |||
| + | Additionally button <span style="color:#FFFFFF">{{Blender Button|'''🗘'''}}</span> on the left side gives possibility to reload trigger actions library on the fly, without need to navigate to global settings panel. | ||
<blockquote>{{Note|If you are not able to assign any action, make sure your Trigger Actions Library path is properly set.}} | <blockquote>{{Note|If you are not able to assign any action, make sure your Trigger Actions Library path is properly set.}} | ||
Latest revision as of 16:23, 5 December 2019
Prefab locators are used during the creation of prefab map assets. Examples of this assets are: roads, crosses, docking companies, services, gas stations etc. So purpose of prefab locators in this assets is to store data for AI traffic connection/rules, players interactions and GPS navigation.
Because of different usage and data we have multiple types of Prefab Locators with their own set of properties described below.
Contents
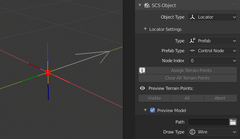
Control Node
Control Node is used: as prefab control in SCS map editor, as connection to other map assets and also as AI traffic entry/exit point.
For proper prefab creation this requirements have to be meet:
- Prefab must have from 2 to 6 control nodes;
- Each control node has to have unique index, defined by "Node Index" property;
- When creating more than 2 nodes, they have to be placed clockwise starting with index 0;
- If prefab should be extended with in game generated terrain, then control node has to have terrain points assigned on it's right side.
Node Index
Property which defines index of the control node.
Assign Terrain Points
Operator for assigning terrain points from mesh to the control node. For usage please use info icon on the left side of operator button.
Clear All Terrain Points
Operator for clearing all terrain points from the control node.
Preview Terrain Points [Visible|All]
Are operators for previewing currently assigned terrain points of the control node. Visible operator will show only assigned terrain points of currently visible mesh in 3D viewport; as for All will also preview any assigned terrain points from hidden mesh.
Sign
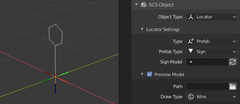
Sign locator is exactly what names says: locator for placing signs or any kind of static object (lamps, trash bins, etc.) on prefabs. With assigning "Sign Model" property from Sign Library it is decided which sign will appear on the place of locator in the game.
Note: If you are not able to assign any sign to "Sign Model" property, make sure your Sign Library path is properly set.
Sign Model
Property defining sign id which shall be used in the game.
Additionally button 🗘 on the right side gives possibility to reload sign models library on the fly, without need to navigate to global settings panel.
Spawn Point
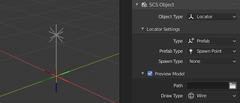
Spawn point locator defines points of different predefined actions or an origin point for a result of an action.
Example usage for company dock for Euro Truck Simulator 2 is creating at least two spawn points:
- Spawn point of type "Company Point" which defines, check in point that player uses when he wants to select delivery;
- 2nd spawn point of type "Unload (Easy)" which defines, the point to which user has to park trailer.
Spawn Type
Property defining type of spawn point.
Traffic Semaphore
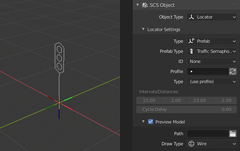
Traffic semaphore locators define stop and go actions for AI traffic. Primarily it's used for traffic lights but it can also be used for any other game defined profile, for example stopping AI car at gas station for fuel filling.
It's behaviour is defined by selected "Profile" and it's bind to user specified "ID". Selected "ID" is then used in "Navigation Points" to define effected AI traffic lane of this semaphore (check Navigation Point for details).
Additionally user can specify "Type" property for defining of exceptional behaviour (use it only if you know what you are doing).
ID
Property defining ID of the semaphore.
Profile
Property defining profile from Traffic Semaphore Library, which defines behaviour of traffic semaphore: intervals/distances and cycle delays.
Additionally button 🗘 on the right side gives possibility to reload semaphore library on the fly, without need to navigate to global settings panel.
Note: If you are not able to assign any profile, make sure your Traffic Semaphore Library path is properly set.
Type
Property defining semaphore type. In most cases "(use profile)" should be in use, meaning any intervals/distances and cycle delay will be defined by used profile from Traffic Semaphore Library.
Intervals/Distances [G,O,R,O]
Properties defining intervals/distances for each state of traffic semaphore. Enabled only if type of traffic semaphore is not "(use profile)".
Cycle Delay
Property defining delay for which each semaphore cycle will be delayed before starting again. Enabled only if type of traffic semaphore is not "(use profile)".
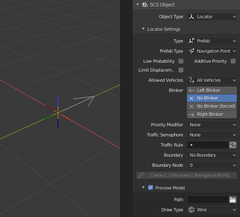
Navigation Point locators are used for creation of AI traffic lanes with curves. Because AI traffic lanes define driving paths for AI cars inside prefab, navigation point locators have to be properly connected and they have to lead from one control node to another. Moreover navigation points on each ends has to have set boundary lanes from which traffic will come and go to other connected map assets.
If prefab shouldn't have any traffic inside, no navigation point locators should be created.
Low Probability
Property defining smaller visiting probability for AI cars.
Additive Priority
Property defining that selected value from "Priority Modifier" will be added to already existing priority for this lane.
Limit Displacement
Property defining extra limited displacement for AI cars.
Allowed Vehicles
Property defining type of vehicles that are suitable to enter AI traffic curves starting at this navigation point. AI cars will try to go into most suitable curve, but if there will be none, they can also use any other even if they are not allowed to.
Blinkers [Left Blinker|No Blinker|No Blinker (forced)|Right Blinker]
Property defining blinker usage for all incoming AI traffic curves connected to this navigation point.
Priority Modifier
Property defining priority of vehicles driving into the next curve. Priority modifier has to be set only on navigation point which next curve is intersecting with opposite lane or next navigation point is merging more curves. Upon that modifier values game will decide order of cars proceeding in the point of intersection.
Note: If property modifiers won't be properly set, game will print out errors about it, so you will be able to fix missing priorities.
Traffic Semaphore
This property binds Traffic Semaphore to AI traffic lanes by it's "ID" property. If "ID" property from Traffic Semaphore locator matches this property value, then AI will behave by the rules of that semaphore locator.
Traffic Rule
Property defining additional rule for AI cars like city areas, motorways or even stop lines. This property can be set to any rule from Traffic Rules Library.
Additionally button 🗘 on the right side gives possibility to reload traffic rules library on the fly, without need to navigate to global settings panel.
Note: Speed limit rules should be avoided in this case, because speed limits are now regulated by signs itself.
Note: If you want to assign rule and list turns out empty, make sure your Traffic Rules Library path is properly set.
Boundary
Property defining input/output AI traffic lanes for selected "Boundary Node".
Note: Each control node can have only one unique boundary value of input/output lanes, meaning you can not use same input/output lane on more navigation points for same control node.
Boundary Node
Property binding control node that should use "Boundary" setting from this navigation point. Moreover this property is used only if "Boundary" of this navigation point will be set some input/output lane, otherwise value of this property doesn't matter.
Operator for connecting/disconnecting two navigation points into a curve for AI traffic paths. In order to use this operator two navigation points have to be selected. Moreover order of selection will tell in which direction curve will be directed.
Map Point
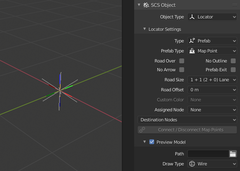
Map Point locators are used for visualizing prefab on world map and GPS navigation. To be properly visualized map points have to be properly connected, meaning cross prefabs will future connections from node to node, but company prefabs will future only "Polygon" visualization.
Proper connections have to be done depending on selected "Road Size":
- Polygon - in this case map points have to be connected in closed quads (useful for visualizing buildings on prefabs);
- any other option - in this case map points have to lead from one control node to another, the same principle as by Navigation Point locators.
Road Over
Property marking this map point to be drawn after all the map points without this flag.
No Outline
Property marking no outline drawing. This might be useful for buildings drawing.
No Arrow
Property marking no drawing for "green" pointing arrow on GPS navigation. This is useful in the case prefabs are using more that 2 control nodes and paths for navigation are still clear.
Prefab Exit
Property marking this map point as prefab exit stops GPS navigation to be visualized further. This can be used in the case of company dock, as usually we don't need extra navigation inside that company dock.
Road Size
Property defining type of the road this map point should visualize. In the case of "Polygon" this map point will be used for visualizing polygons instead of road and has to be connected with 3 others into a quad. Moreover using "Polygon" option will give user option to select "Custom Color" for visualization of polygon.
Road Offset
Property defining centre offset between road lanes.
Custom Color
Property giving possibility to define custom color type in the case "Road Size" of this map point is set to "Polygon". There are 3 different custom colors each for it's own purpose:
- Light - used for accessible prefab areas;
- Dark - used for buildings;
- Green - used for grass and inaccessible prefab areas.
Assigned Node
Property for binding map points to control nodes. Has to be set on map points which should be used as entry/exit GPS navigation points to/from this prefab.
Destination Nodes
Property defining to which control node GPS can navigate from this map point (some sort of direction giving). This should be used only in the case that any neighbour of this map point has more that 2 neighbours and current map point is not having any "Assigned Node".
Connect/Disconnect Map Points
Operator for connecting/disconnecting two map points for connection lines used in world map and GPS navigation. In order to use this operator two map points have to be selected. Selection order this time doesn't matter as connections between map points are undirected.
Trigger Point
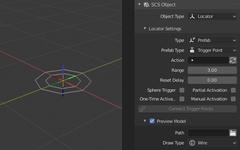
Trigger points are intended to mark area on the prefab where action will be able to take place. Actions are taken from Trigger Action Library and are triggered when player enters area marked with trigger point polygons or sphere alone.
Example of trigger points usage is marking rest areas on prefabs for Euro Truck Simulator 2 with a polygon.
Action
Property defining action which should trigger when player enters area. Available actions are predefined and loaded from Trigger Actions Library.
Additionally button 🗘 on the left side gives possibility to reload trigger actions library on the fly, without need to navigate to global settings panel.
Note: If you are not able to assign any action, make sure your Trigger Actions Library path is properly set.
Range
Property defining range of trigger point or area of activation. In the case of used "Sphere Trigger" property defines radius of spherical area around trigger point, otherwise this defines vertical range of trigger area.
Reset Delay
Property defining time in seconds that player have to be outside trigger area until he can activate it again.
Sphere Trigger
Property defining this trigger point should behave as sphere trigger. In the case of usage, this trigger point should not be connected to any other trigger point.
Partial Activation
Property defining that only touching border of trigger area by player is enough to trigger action.
One Time Activation
Property defining that this trigger point can be activated only once.
Manual Activation
Property which defines that player has to manually activate action once he is inside trigger area.
Connect/Disconnect Trigger Points
Operator for connecting/disconnecting two trigger points into trigger area. Make sure that trigger area is closed n-gon. For usage of this operator two map points have to be selected. Selection order doesn't matter as connections are undirected.
